
User(s)
In Linux, every process (or running program) runs with the privileges of a particular user and every file (or directory) is owned by a particular user. Therefore,
- Access to file and directories are restricted by user.
- The user associated with a process determines the files and directories accessible by that process.
Users are defined by names, because it is easy for us to remember users by their names, but internally, the operating system tracks every user by a UID Number. This complete mapping of user names to uid number is defined in a flat file database /etc/passwd. This file stores information about the local users organized into seven fields in following format:
USERNAME:PASSWORD:UID:GID:GECOS:HOMEDIR:SHELL, where:
-
USERNAME is a human readable name (also the login name required while logging into the system)
-
PASSWORD is where historically, passwords were kept in an encrypted format. Now they are stored in a separate file called
/etc/shadow -
UID is the unique identification number using which operating system tracks a user. It is mapped to field USERNAME
Note:- USERNAME is unique, i.e. more than one users cannot have the same USERNAME, whereas
- UID is not necessarily unique, i.e. more than one USERNAME(s) can be associated to same UID number. (For more clarity on this, search for
-oor--non-uniqueoption inman useraddorman usermodcommand.)
A possible scenario where this may be useful:
-
GID is the user’s primary group identification number. Groups are discussed later in detail.
-
GECOS field was used by General Electric in their variant of Unix OS (General Electric Comprehensive Operating System) for storing service/role information of UNIX Programmers, which later became the field for storing user’s full name with optional additional relevant information. It became standard practice to use the GECOS field for storing full names, phone numbers, building numbers and email addresses. Now it is simply considered as the User Comment Field or more appropriately User Information Field. Here you’ll find some nice information about the History of GECOS Field.
-
HOMEDIR field contains the location of user home directory, which is used to store user’s personal data and user specific configuration files.
-
SHELL field contains the location of shell program that runs when the user logs in. For a regular user, this is normally the program that provides the user’s command line prompt.
-
The
idcommand (output shown below) is used to show information about currently logged-in user. Basic information about another user can also be requested by passing the username as an argument to theidcommand. …truncated output
Note: In output shown above, firstidcommand (without any arguments) is executed which shows user sanketkrsingh is the currently logged in user. It also displays information about groups to which user sanketkrsingh belongs to. I’ll be discussing about groups later in detail. Secondidcommand is executed with username student as an argument, to which the basic info about the user student is displayed. -
To view user associated with a file or directory, one may use
ls -lcommand.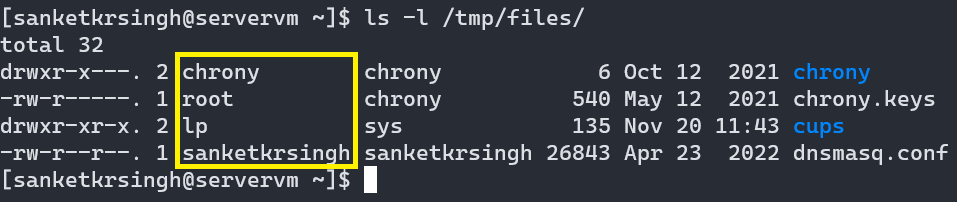 Note: In output shown above, highlighted column list the names of users and the last column list the names of files/directories owned by the users.
 -
To view user associated with all running processes , one may use
ps -ef(Standard syntax) orps axu(BSD syntax) command.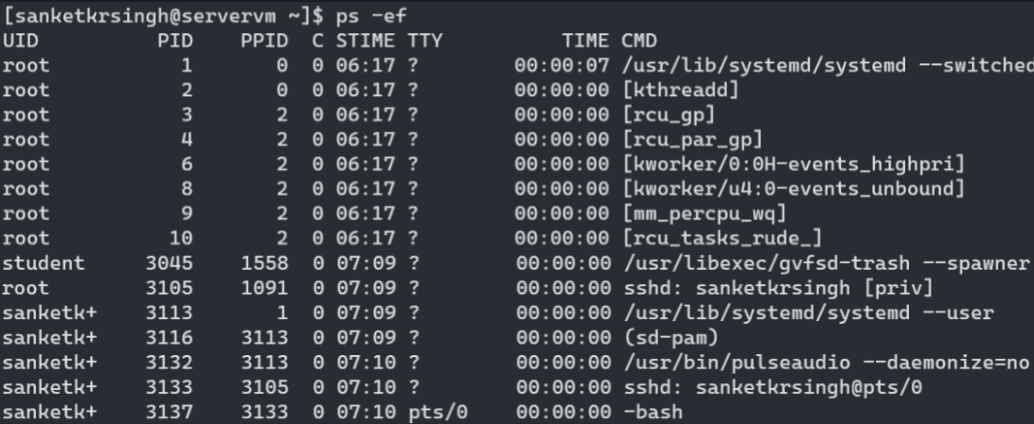 …truncated/edited output
Classification of Users in Linux
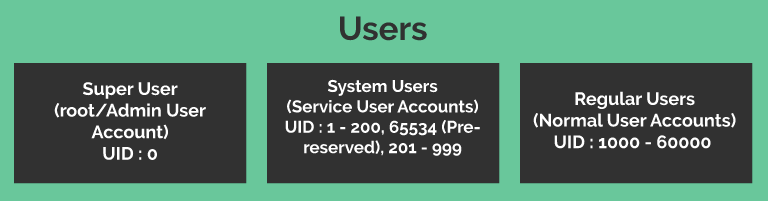
On Linux systems, as per the image above, users can be further classified into three categories:
-
Super User
Super User in Linux is similar to Administrator User in Windows based OSs. On Linux platform, by default the name of this Super User is root. This user has UID 0 and it enjoys all the privileges on the system.
Note: Remember it’s not the name but the UID value which matters. Names are just for our convenience. Any username with UID value 0 will be considered as Super/Admin User. As per the convention, username associated with UID 0 is root. System always refers to users by UID number. -
System Users
As discussed earlier:
every process (or running program) runs with the privileges of a particular user
Therefore, for important services and processes which runs in the background and keeps the system functional, we have System Users or Service Accounts. Usually, System Users with UID 1 – 200 comes predefined and you could check uidgid reservation validity in/usr/share/doc/setup-*/uidgid file on most of the Linux distributions like RHEL, Rocky, Fedora etc. UID 201 – 999 are available for other services/processes installed by user(s) in the future.
- Regular Users
Regular Users are the normal user accounts using which one can log inside the system with right credentials and can perform multiple relevant tasks. Example can be employees working in various sections/departments like Web Developers, System Administrators, Accountants, Database Developers, Employees at reception having access to the system etc. Regular Users by default are associated with UIDs starting from 1000 onwards that goes up to 60000 on most of the systems and can be extended further depending upon the requirements.
Note: On most system, UID Ranges defined here, are usually defined within /etc/login.defs file.
Group(s)
Group, as the name suggests is for bringing multiple users together for sharing system resources like files and directories.
For example: Consider there is a Web Development team working on a single project. Obviously, all the members of the team, need access to the set of files and directories related to the project. Therefore, rather than separately giving them access defined by their User permissions, they can all be brought within the same group say WebDevTeam and then can be given necessary Group Permissions, required to access the common set of files. That is, rather than defining or restricting access control using User Permissions, we are using Group Permissions. This makes file sharing, privilege and access control much faster and easier.
- Groups can be classified in two different ways in Linux. I’ll be calling it:
- Classification of Groups (Type1)
- Classification of Groups (Type2)
Classification of Groups in Linux (Type1)

1. Primary or User Private Group
- Every user has exactly one primary group.
Note: A user without a primary group or more than one primary group is not possible.
Note: Two or more users having the same primary group is possible but not encouraged for the sake of the security and privacy. - For local users, the primary group is defined by the GID number of the group listed in the 3rd field of
/etc/passwdfile. - Whenever user creates a file (or directory), by default that files gets associated with the primary group of the user, i.e. primary group owns the new files created by the user.
- As per the convention, the name of the primary group of the newly created user is same as the USERNAME and that user is the only member who belongs to that group. If available (GID number), same applies to GID as well, i.e. user’s primary group has the same GID as the user’s UID.

Whenever a user is created with default values, this is how it looks.
2. Secondary or Supplementary Group(s)
- Users may be a member of 0 or more supplementary groups.
- The users that are supplementary members of the local groups are listed in the 4th or last field of the
/etc/groupfile. - Main purpose of Supplementary Groups is resource sharing between multiple users.
Note: I discussed an example above of sharing files b/w multiple user by creating a group called WebDevTeam. In that scenario, obviously every user belonging to the group are supplementary members of the group, i.e. WebDevTeam is every user’s secondary group. This is safe and practical approach than letting others join one’s primary group for sharing of resources. This is what secondary groups are made for.
Classification of Groups in Linux (Type2)

The classification of group above is similar to the classification of users defined above. It divides group into three categories based on the GID values, just like we divided users above based on the UID values.
1. Super User Primary Group
Quite self explanatory, it is the user private group (or primary group) of Super User root.
Note: As per the convention, if available, the primary group of a user goes by the same name as username and gets the same GID value as UID. Therefore, group name root is the primary group of Super User root and GID 0 is reserved for group name root.
2. System or Service Groups
We already know, that for important services and processes which runs in the background and keeps the system functional, we have System Users or Service Accounts. Usually, System Users with UID 1 – 200 comes predefined and you could check uidgid reservation validity in/usr/share/doc/setup-*/uidgid file on most of the Linux distributions like RHEL, Rocky, Fedora etc. UID 201 – 999 are available for other services/processes installed by user(s) in the future.
The primary groups which got created and associated while creating System Users, are simply called System Groups. GID 1 – 200 comes predefined and GID 201 – 999 are available for other services/processes installed by user(s) in the future.
3. Regular or Normal Groups
Regular Groups are the mix of both primary groups and supplementary groups. Primary group associated with Regular Users and Supplementary groups created for resource sharing. These groups by default gets GID defined between 1000 – 60000 and depending upon the requirement the limit can be increased further.
Like Type2 Classification above, we have following similar thing for Groups:
- Each Groups have a name and an associated number (GID).
- Group names are for our ease, as it is much easier to memorize a name than a number, though Linux Kernel/OS tracks each group by the associated GID number.
- Local groups are defined within flat file database
/etc/group - This file stores information about the local groups organized into four fields in following format:
GROUPNAME:GROUP_PASSWORD:GID:GROUP_MEMEBERS, where:
a. GROUPNAME is the name of the group
b. GROUP_PASSWORD is the encrypted group password. If this field is empty, no password is needed.
c. GID is the numeric group ID.
d. GROUP_MEMBERS is the list of USERNAMES that are members of the group, separated by commas.
Note: Similarly, like in the case of users, group passwords are stored separately in/etc/gshadowfile.
Gaining Super User Access
Super User (root) in UNIX/Linux Systems is similar to local Administrator User in Windows Systems, i.e. a user with all power and privileges, capable of both making up and breaking up the system.
root User is used for performing System Administration Tasks. Few of them are listed below:
- Adding, Removing and Managing Users, Groups and Passwords
- Installing/ Uninstalling Software Packages
- Managing running Services/ Processes and configuring Config Files
- Managing System Devices
Note: Most system devices are controlled by root, but there exists few exceptions like Removable Devices. Removable devices like USB Pen Drives etc. are allowed to be controlled by a regular/ normal user. Thus, a not-root user is allowed to add and remove files and otherwise manage a removable device, but only root is allowed to manage fixed devices like HDDs and SSDs by default. - etc…
As once, Uncle Ben advised Peter Parker (aka Spider-Man), that:
With great power comes great responsibility
With unlimited power root user can damage a system to any extent: remove files and directories, remove user accounts, add backdoors etc. If the root account is compromised, someone else would have administrative control of the system. Therefore, it is always advised to log in as a normal user and escalate privileges to root when required or to perform various System Administration Tasks.
Caution: One common practice on Windows (in the past) is for the local Administrator User to log in directly to perform System Administration Tasks. However, on Linux, it is recommended that system administrators should not log in directly as root. Instead, system administrators should log in as a non-root user, and use other mechanisms (like su, sudo, PolicyKit for example) to temporarily gain superuser privileges.
By logging in as the administrator user, the entire desktop environment unnecessarily runs with administrative privileges. In that situation, any vulnerability which would normally only compromise the user account has the potential to compromise the entire system.
In recent versions of Microsoft Windows, Administrator User is disabled by default, and features such as User Account Control (UAC) are used to limit administrative privileges for users until actually needed. In Linux, the PolicyKit system is the nearest equivalent to UAC.
Switching Users (and Escalating Privileges) with su command
The su (switch user OR substitute user) command allows a user to switch to a different user account.
- If a normal/ regular user chooses to switch to other user account, two thing are required – USESRNAME & PASSWORD (of other user account). If USERNAME is not specified, the root account is implied by default.
- If a root user chooses to switch to other user account, only USERNAME of other user account is required, no prompt will be displayed asking for the PASSWORD of the other user account.
su [-] <USERNAME> is the syntax for switching accounts using su command.
Lets understand further with examples shown in the image below:
Note: The su login examples below are divided into two sections: Login Shell and Non – Login Shell. A user can switch to other user account and obtain either login or non – login shell of the other user. If su command is followed by a hyphen (-) sign, the resulting shell is login shell, otherwise non – login shell. In login shell all the environment variables (responsible for setting the user environment) are re-initialized as per the user you are switching to whereas in non – login shell some of the environment variables gets initialized as per the user you are switching to and some remain uninitialized, holding the old value as per the user from whom you are switching to. Therefore, a login shell provides a clean login and is the preferred and recommended one.
Login Shell is what a user gets, when it logs into the system directly, the very first time. To verify whether the shell you are working on is login shell or non – login shell there are two ways:
- Execute command
$ echo $0(Note, always the first $ or # sign is the shell prompt, not something you must enter). Output-bashimplies login shell andbashimplies non – login shell (if bash shell is being used). - Execute command
$ echo $SHLVL. Output 1 implies login shell and anything more than 1 implies non – login shell.
In case of non – login shell, some of the important environment variables like PWD, PATH, LANG, MAIL, etc. remains uninitialized, i.e. they hold the old values of the previous user and not of the user we switched to. Therefore, always prefer a login shell over a non – login shell, because in it, everything (all environment variables) gets initialized as per the new user we are switching to.
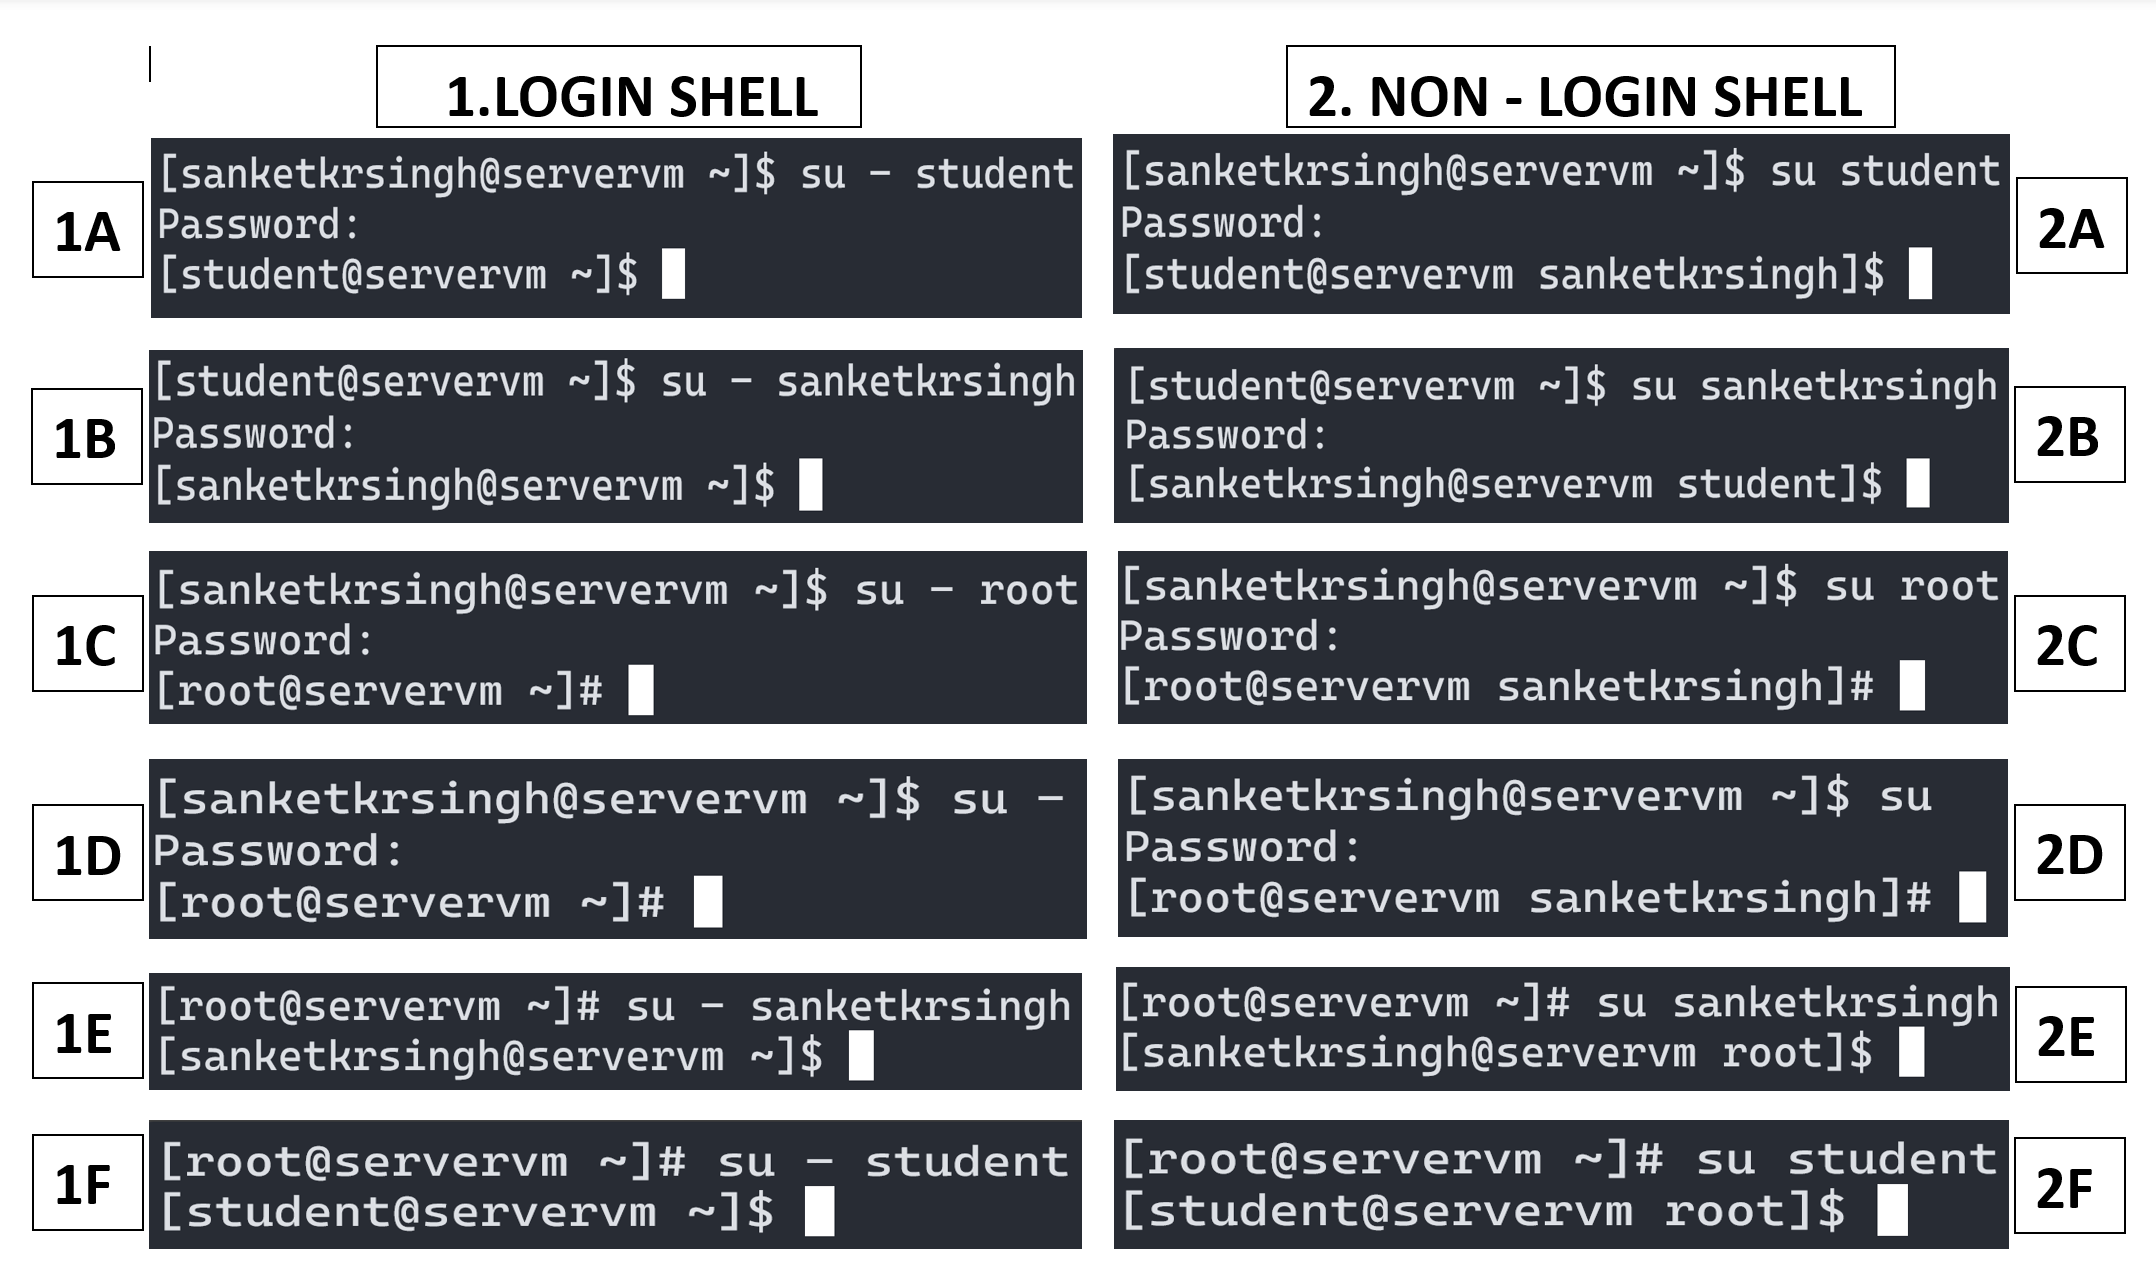
1A regular user sanketkrsingh switching to regular user account student & obtaining login shell, 2A same as 1A but obtaining non – login shell.
1B regular user student switching to regular user account sanketkrsingh & obtaining login shell, 2B same as 1B but obtaining non – login shell.
1C regular user sanketkrsingh switching to superuser account root & obtaining login shell, 2C same as 1C but obtaining non – login shell.
1D regular user sanketkrsingh switching to superuser account root & obtaining login shell, 2D same as 1D but obtaining non – login shell.
Note: The user name is not mentioned, which implies superuser root.
1E superuser root switching to regular user account sanketkrsingh & obtaining login shell, 2E same as 1E but obtaining non – login shell.
1F superuser root switching to regular user account student & obtaining login shell, 2F same as 1F but obtaining non – login shell.
Note: su command is used frequently, typically for escalating/switching to root user account for performing system administration tasks when required. However, with the -c option, it can be used like the Windows utility runas to run an arbitrary program as another user. For more details refer to man/info page: $ man 1 su or $ info su.
Escalating Privileges with sudo command
Regular users may choose to escalate their privileges, by switching temporarily to root user account for performing system administration tasks, using su command as defined above. But there are two disadvantages to this method of privilege escalation:
- Acting as root, all the privileges of root are granted. Not only users can restart a specific service like web server, but they can also cause damage to system by removing important files and directories like
/etc. - All users requiring superuser privilege in this manner (using
su) must know the root password.
Therefore, to get rid of above mentioned vulnerabilities and make things more safe and secure, the idea of sudo was introduced.
The sudo command permits a user to run a command as root, or as another user, based on settings in the /etc/sudoers file. Unlike su command, sudo requires users to enter their own password for authentication, not the password of the account they are trying to access. This enables an administrator to hand out fine – grained permissions to users to delegate system administration tasks, without having to hand out the root password.
One additional benefit to using sudo is that all commands executed using sudo are logged by default to /var/log/secure file.
Note: On RHEL and based distributions, from RHEL7 onwards all members of group wheel can use sudo to run commands as any user, including root. The members will be prompted for their own password. Historically, membership in group wheel has been used by UNIX like systems to grant or control superuser access.
Note: Most GUI based system administration applications use PolicyKit to prompt users for authentication and to manage root access. In RHEL7 and based distributions, PolicyKit may also prompt members of group wheel for their own password in order to get root privileges when using GUI based tools. This is similar to the way in which they can use sudo to get those privileges at the shell prompt. PolicyKit grants these privileges based on its own configuration settings, separate from sudo. For more details about how this system work, one may refer to man pages pkexec(1) and polkit(8).
/etc/sudoers file basically tells us: what users(or groups) on what hosts with whom else’s privileges can run what commands. The format of the entries you may see, simply goes like this: User(s)/Group(s) Host(s) RunAs(Users/Groups) Commands(s), i.e. User/Group List followed by Host List followed by RunAs(User/Group) List followed by Command List. Lets try to interpret few lines from /etc/sudoers file:
%wheel ALL=(ALL) ALL
Users of group wheel can run any command on any host as any user.
Note: Names with % symbol preceding them implies group names, First ALL implies All Hosts, Second ALL implies All Users with whom privileges, members of group wheel can execute commands and Third ALL implies All Commands.
student ALL=(ALL) ALL
User student can run any command on any host as any user.
sanketkrsingh ALL=(ALL) NOPASSWD: ALL
User sanketkrsingh can run any command on any host as any user, without authenticating himself.
ram servervm.example.com, clientvm.example.com=(root) /sbin/useradd, /sbin/userdel, /sbin/usermod, /sbin/groupadd, /sbin/groupdel
User ram can run user management commands on two hosts – servervm.example.com & clientvm.example.com, with privileges of superuser root.
Note: Mulitple hosts works, only when sudoers file is being shared or centralized for a network of systems. Something which cannot be explained within the scope of this article.
%softwaremgmt servervm.example.com=(root) NOPASSWD: /bin/rpm, /usr/bin/up2date, /usr/bin/yum, /usr/bin/dnf
Users of group softwaremgmt can run software management commands on host servervm.example.com, with privileges of superuser root.
Thing can be made more easier and organised by making use of aliases like: User_Alias, Host_Alias, Runas_Alias and Cmnd_Alias. For more details you may refer to sudoers(5) man page. Scroll down to section EXAMPLES for more examples.
I’m resting this post here and in NEXT POST I’ve continued with following topics:
- Managing Local Users using User Management Commands (id, useradd, usermod, userdel, passwd).
- Managing Local Groups using Group Management Commands (groupadd, groupdel, gpasswd).
- Managing User Passwords (understanding the format of
/etc/shadowfile, password aging, restricting user access to system)- Understanding the Login Process.